Spring Craft Yarn Dancing sticks & dreamcatchers


Kids craft activities using yarn are always unique, giving children a different opportunity to create something individual and bright for them self or for a gift.
We had lots of fun collecting and painting sticks for these spring time dancing sticks made with spotlights colourful flinders yarn.


Using this silky smooth 100% cotton 8 ply yarn from Spotlight  in kids craft was great for developing fine motor skills, making patterns, discussing colours and the craft ideas are endless. 
With our bright spotlight yarn we made Pom-Pom dancing sticks, a twirling wand and a zig-zag dancing stick.

The kids loved dancing around with them, twirling and waving them in the wind.  after a cold miserable winter, the sun is finally shining and the air smells like Spring, these were a little celebration to inspire the kids to get outside and enjoy the outdoors again. Making them was a process that involved a bit of patience, focus and fine motor skills. Dimples did great weaving the yellow zig-zag yarn through his forked stick. Because this yarn is thick and smooth, it is great quality which made it easy for the kids to handle.


This yarn is available in the most bright and beautiful colours from spotlight stores. you can find them on Facebook.
Spotlight is a family owned and operated Australian business that has become as household name. Spotlight is a brand loved and used by many for all things crafting, fabrics and home wares. They also have an awesome party section.

With our bright yarn we had the opportunity to #getcreative and craft some spring time dream catchers and dancing sticks to have fun with.

What you need:
Flinders 8ply yarn from spotlight 
Rainbow painted sticks
Feathers
Metal ring
Glue and scissors.
 
 
Dancing sticks:
First have your children find some cool sticks and paint them in beautiful bright spring colours.
Talk about the colours, name them and point out other colours in nature. We sat by the lake on a grassy hill to paint our sticks.  If your not a fan of painting with little ones, here are some tis to make it easy.


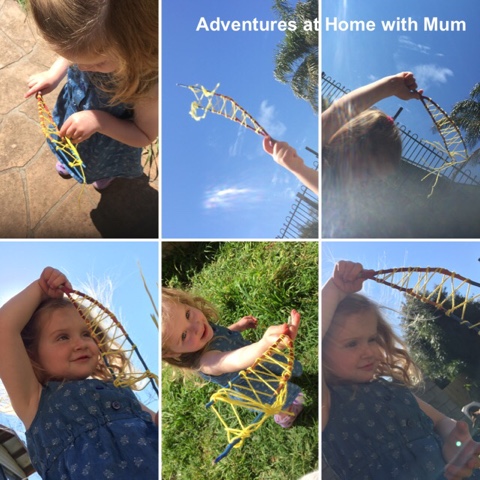
Once dry, weave yarn around the sticks. Depending on the shape of your stick, they could thread it around, tie strings off one end like a wand or put two sticks in a cross and weave it around all four ends to make a pattern. 


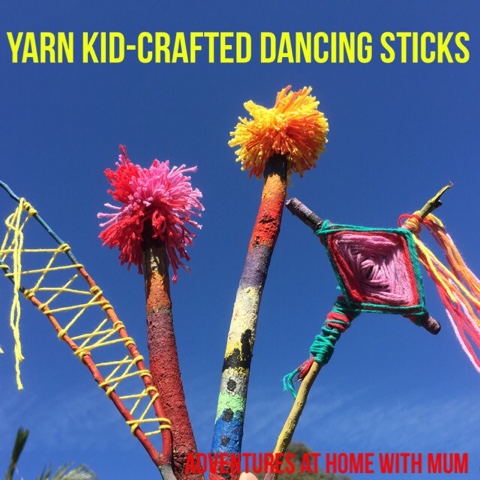
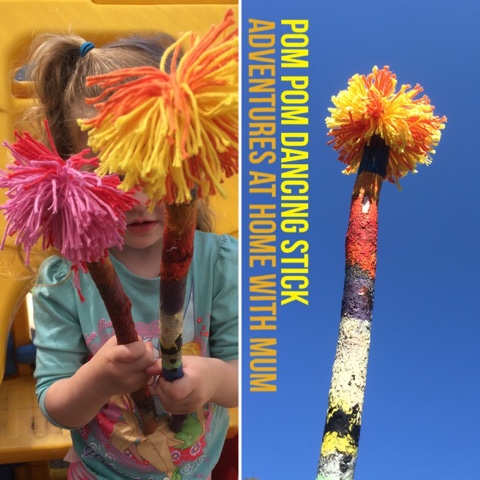
Pom-pom spring time sticks.
These are awesome, they look about like mini Lorax tuffaluffa trees or big bright flowers.
First make a pom-Pom. its easy enough to do on your hand.


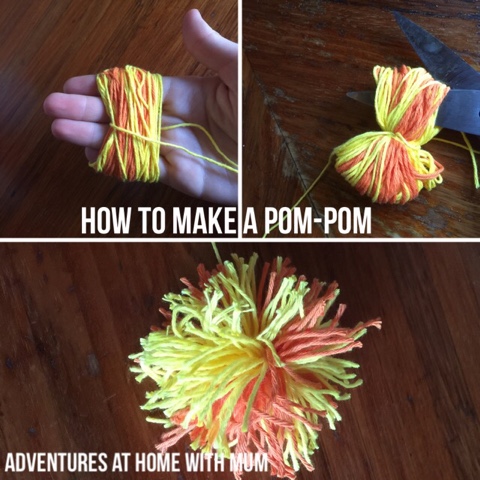
Next glue it to the top of your rainbow stick. Done. Isn't it cute? This was both Dimples & Cherubs favourite.


Dream catcher:
Crochet a circle pattern, like a doily, as your centre piece feature (I cant knit or crocket so had Mum do some cute little ones we could use). 
Shape wire into circle and cover it around and around with spotlights 100% cotton 8 ply yarn.  It was really easy to manage, it circled in evenly, covered all the wire smoothly and was not fluffy at all.
Then with a little help, get your child to thread through the doily and back to the sides in the pattern of a star. It's a little bit tricky and requires a lot of concentration but dimples had a good go of it and practiced tying knots at the bottom of it.
Add hanging strings and feathers from the bottom.
 

We still have plenty of yarn left and will be making some more dream catchers to give as gifts. smaller kid friendly ones. with the rest of the bright colours, the kids was some more pom-pom sticks.
Visit Spotlight and check out their online catalogue to see what type of yarn and craft activities you can #getcreative with.

This product talk is brought to you by Nuffnang and Spotlight


Frozen Theme Party ideas

 
Little Miss Cherub is TWO - Can you believe it? and she is a little Frozen obsessed. You know the song all the frozen fans sing? she can sing all three words of it "let it go" over and over and over and over...  So for her party we held a Frozen Theme party with a blue & purple theme, I pulled out our blue Christmas lights and it made it all so magical.
 

I used some glittery silk and chiffon material to create a frozen skirt that lined the kitchen area ( you can see it in the picture above), and as I have said before when we have had kids Parties for Dimples, I always forget to take photos of these small touches. Its often the small touches that pull it all together. The fortnight before, I made a Frozen theme Backdrop for some photo fun. Miss Cherub helped paint Olaf, and Dimples helped cut out some paper snow flakes. It sat nicely among the Christmas lights and all the kids (of all ages) had a go at being Elsa or Olaf.


For party Activities we had a couple of awesome Sensory tubs thanks to Sensory Playground Australia - They gave us some of these cool water bead cubes, they're firmer and more fun then water beads. The children tried stacking them and building Queen Elsa a castle before they crushed them and mixed them into a field of snow.  One tub had large frozen glitter boulders (made in a balloon with glitter, food colour and water) as well as the cool water bead cubes and some frozen figurines.
 
 
I did some face painting for the kids, the boys wanted Olaf and snowflakes on their cheeks and the girls got a tiara above their brows. There were also frozen theme tattoos and a take home goody bag for the guests that consisted of stickers, a balloon, magic sand, bubbles, a frozen badge, tattoos, a bracelet and a small lolly bag.


The other Sensory tub had massive 'Amaze balls' also given to use by sensoryplaygroundaustralia - They were by far the most intriguing thing the children have seen. You can see the size difference between the usual water beads and the amazeballs.
If you want to get your hands on some of these beauties check out Sensory Playgrounds Ebay Site. They have so many cool sensory resources that you can purchase for less then a cup of coffee.
Highly recommended.


There were balloons strung up every where, a starry background and lots of purple and blue things.
We had a bubble machine going, a ball pit full of balloons and balls, some silk materials hung up along the clothes line and lots of pink/purple food including; fairy bread, pink biscuits, strawberries dipped in white chocolate, watermelon and red grapes, pretzels dipped in purple or blue icing, strawberry & cream lollies, Blue jelly, baby spring rolls and party pies.

 
The cake was a castle of course. I made 3 layers each a different shade of purple, and cut stairs from them then covered it in blue roll out icing. I used a play dough roller with a brick pattern on it and decorated it with baby marshmallows to represent the snow balls. The tower was made from rice crispies and based on this Princess Cake tutorial by Paging fun Mums.
 
 
I think half the fun for the girls was dressing up in frozen outfits and chasing bubbles around, dancing among the streams and silk curtains and listening to their favourite song... You guessed it! Let it go.
There was also play equipment outside, a nice fluffy rug to sit on and various frozen books and colouring.


And the day after the Party, Miss Cherub was still having fun with those sensory trays. Who would have thought they were nice to use as a toe massager.


Happy Adventures 

You can keep updated with all our Adventures Plus more by following Adventures at Home with Mum on Facebook, follow us on Pinterest, or check us out on Instagram.

Thanks for visiting.

Scented Instant Snow castles from play gel


Play Gel? What is play gel I hear you mutter as you read the title... You'll never guess.
A form of instant snow, if you have bought instant snow you will agree that it is not cheap, I got some years ago when I made The Melted Snow Man sensory Tray for Dimples. I think I paid $6-7 for one little tube that was used a few times. This play gel costed about $1 and is 3 times the amount.
I came across this one day browsing pinterest, Science Kiddo shared a pretty interesting post on how to do it. I was reluctant to begin with, knowing what it was made of, if I told Adventures at home Dad I let the kids play with **** today, I am sure he would have looked at me sidewards and questioned my sanity.
 
 
Have you  guessed yet?
Here is how we made Castles from scented play gel....
*get a jug of water *add colouring  *add essential oil or scented essence (we used peppermint essence) *Get an unused New Disposable Nappy *Open it and lay it flat with the absorbent side up and pour on your mixture *add more water as needed *cut along the side of the Diaper and empty the contents *add more scent, colour, glitter or water if needed. *Play

 
After a lot of exploration with their hands and fingers, Dimples and Miss Cherub used animals and buried them, poured more water on and explored with it for a long while. It just kept soaking up water, I was amazed. From one disposable Nappy they had a tray each full of play gel, it smelt so nice and refreshing and looked pretty cool to dig in to. After a while they turned to 'building'

 
Using sand moulds, buckets and plastic cones they build 'snow castles'. This was quite a challenge, it took a lot of patience and skills because the scented play snow was not like sand, it didn't pack in tight and stay firm so the larger the castle the harder it was. Dimples mastered it with a slow steady technique and noticed that the cones and taller castles wobbled like jelly.  It was definitely a fun and new experience, Dimples and I discussed the scientific side of the play gel and how it soaks water, what it is made from, what will happen after we let it dry. Miss Cherub and I labelled how it felt, the shapes we made and the colour/smell of it.

 
If you are curious like I was, the stuff inside the diapers is similar to what is used in water crystals, water-beads and so forth. It is a form of polymer, and although it is manmade it is non-toxic and can not be absorbed through the skin see here. However it is better to ere on the side of safety so for that reason it is not recommended to be consumed, due to the fact that it absorbs 50 times its weight in water (like water-beads) - Read this here if you are concerned although it is labelled as non toxic and safe it is likely to cause irritation if consumed so as always, keep an eye on the kids as they play, don't leave them alone if you feel they will eat it and don't give it to babies or toddlers who mouth anything.
 

After playing, you can store it in a container in a dry and watch what happens as it dries out but remember that disposable nappies are not good for our environment so don't go pouring it in the yard, near a drain or down the toilet remember to dispose of it adequately as you would with other non-degradable waste. If you store it in a air tight container you can get a few play sessions out of it, just add some more water next time and away you go.


Happy Adventures 

You can keep updated with all our Adventures by following Adventures at Home with Mum on Facebook, follow us on Pinterest, or check us out on Instagram.

Thanks for visiting.

DIY Pallet Rockwall Climbing Frame & Slide


We have another outdoor play addition to our yard, a DIY climbing frame with a slide and rock wall. It is made up of mostly recycled materials and was pretty simple to put together. It also doubles as a cubby underneath.


It was easy to make out of two wooden pallets, we angled them into an A point and used triangle shaped plywood off cuts to brace them together at each side making an A frame shape. Next we used some artificial grass over one pallet and across the top to cover the rough pieces of wood. This was secured on with a strip off cut of plywood that goes the length of the grass edge and along the top we put a platform of plywood. This works to double secure the frame together as it is screwed to both pallets and holding the grass firm as well & gives the children a sturdy place to gain balance after climbing the rock wall.  you will also need these. 


The grass is secured on with some rock wall screw on stones Like these ones here, at play equipment supplies or you could do it the recycled was and use blocks of wood. Next we secured the slide part of an old slippery dip that had a rusty broken ladder, we picked this up next to nothing from the buy back centre as someone had gotten rid of it. All we did was dispose of the old ladder and screw it to the top of the climbing frame.


The back of the pallet Climber works like a ladder, the front as a rock wall and a slide.
It did not take very long to build and has been a fun addition in the yard.
It challenges Dimples & Miss Cherub, aiding in gross motor skills, strength, agility and balance.


While the underneath gives a secret hideaway great for imaginative play, it has been a mud bakery, a place to take playdough, a shop, a tent while camping in the wilderness, its been part of an Outdoor Obstacle Course,  it has been a shop and a sand/water kitchen and it has been used in Outdoor surface rubbing. I am sure their imaginations will use it in many other ways as time goes by.


Are your children naturally drawn to the outdoors or do you need to encourage outdoor play?

Here are some of our Outdoor Play Areas and Activity Ideas to help get them outside for longer.


Happy Adventures 

You can keep updated with all our Adventures by following Adventures at Home with Mum on Facebook, follow us on Pinterest, or check us out on Instagram.

Thanks for visiting.

LinkWithin

Related Posts Plugin for WordPress, Blogger...