DIY Smell & Shake Discovery Bottles for Babies & Kids


I made these DIY Scented Sensory Bottles when Dimples was younger, they were a definite hit. He still has the Coffee Bean one and it still smells so good. I decided to do a new and improved batch of scented discovery bottles for Miss Cherub.


Dimples was a great helper, he came up with some ideas while he made these for his baby sister.
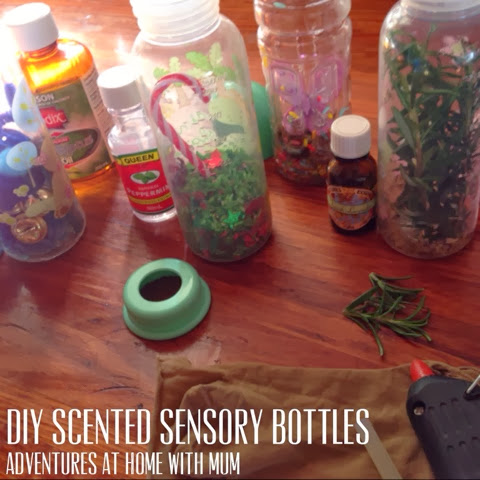
First we gather our materials, we tried to stick to a theme of a colour. Because these are scented the materials need to be able to hold and soak up the essence and essential oil.
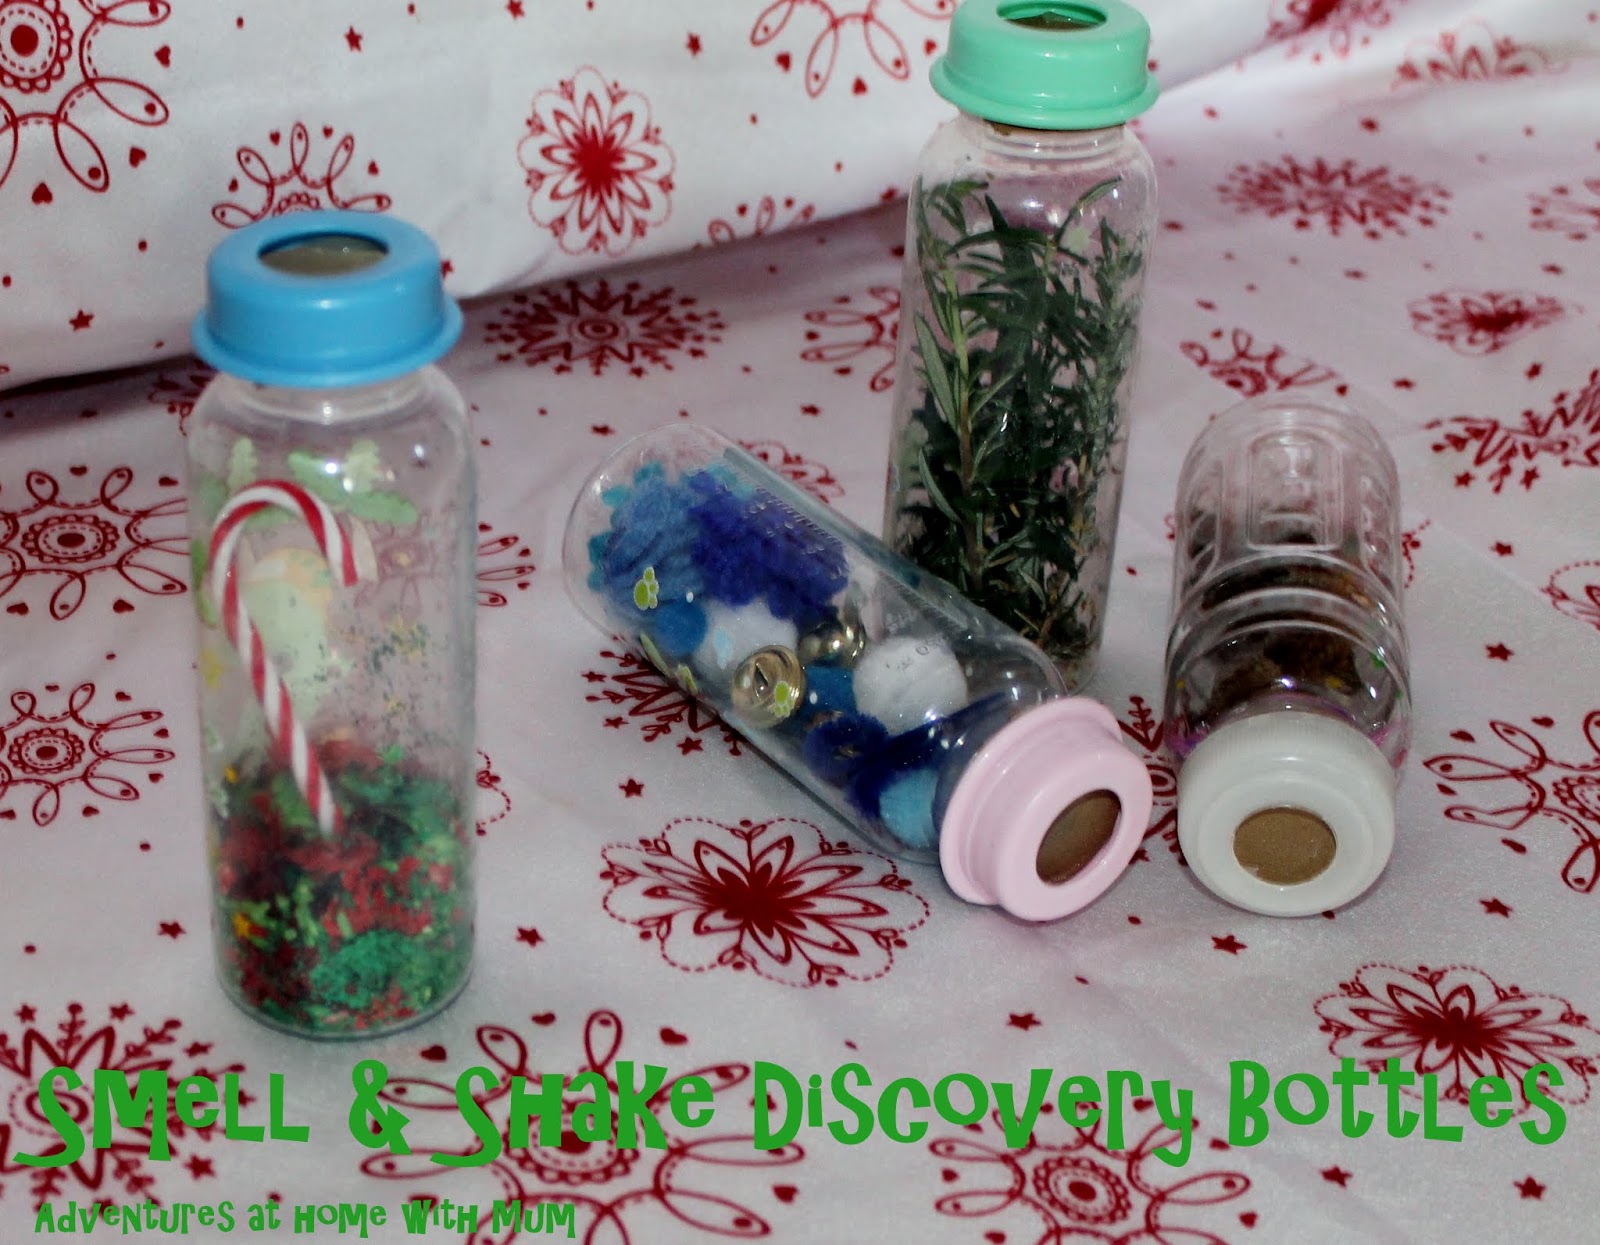
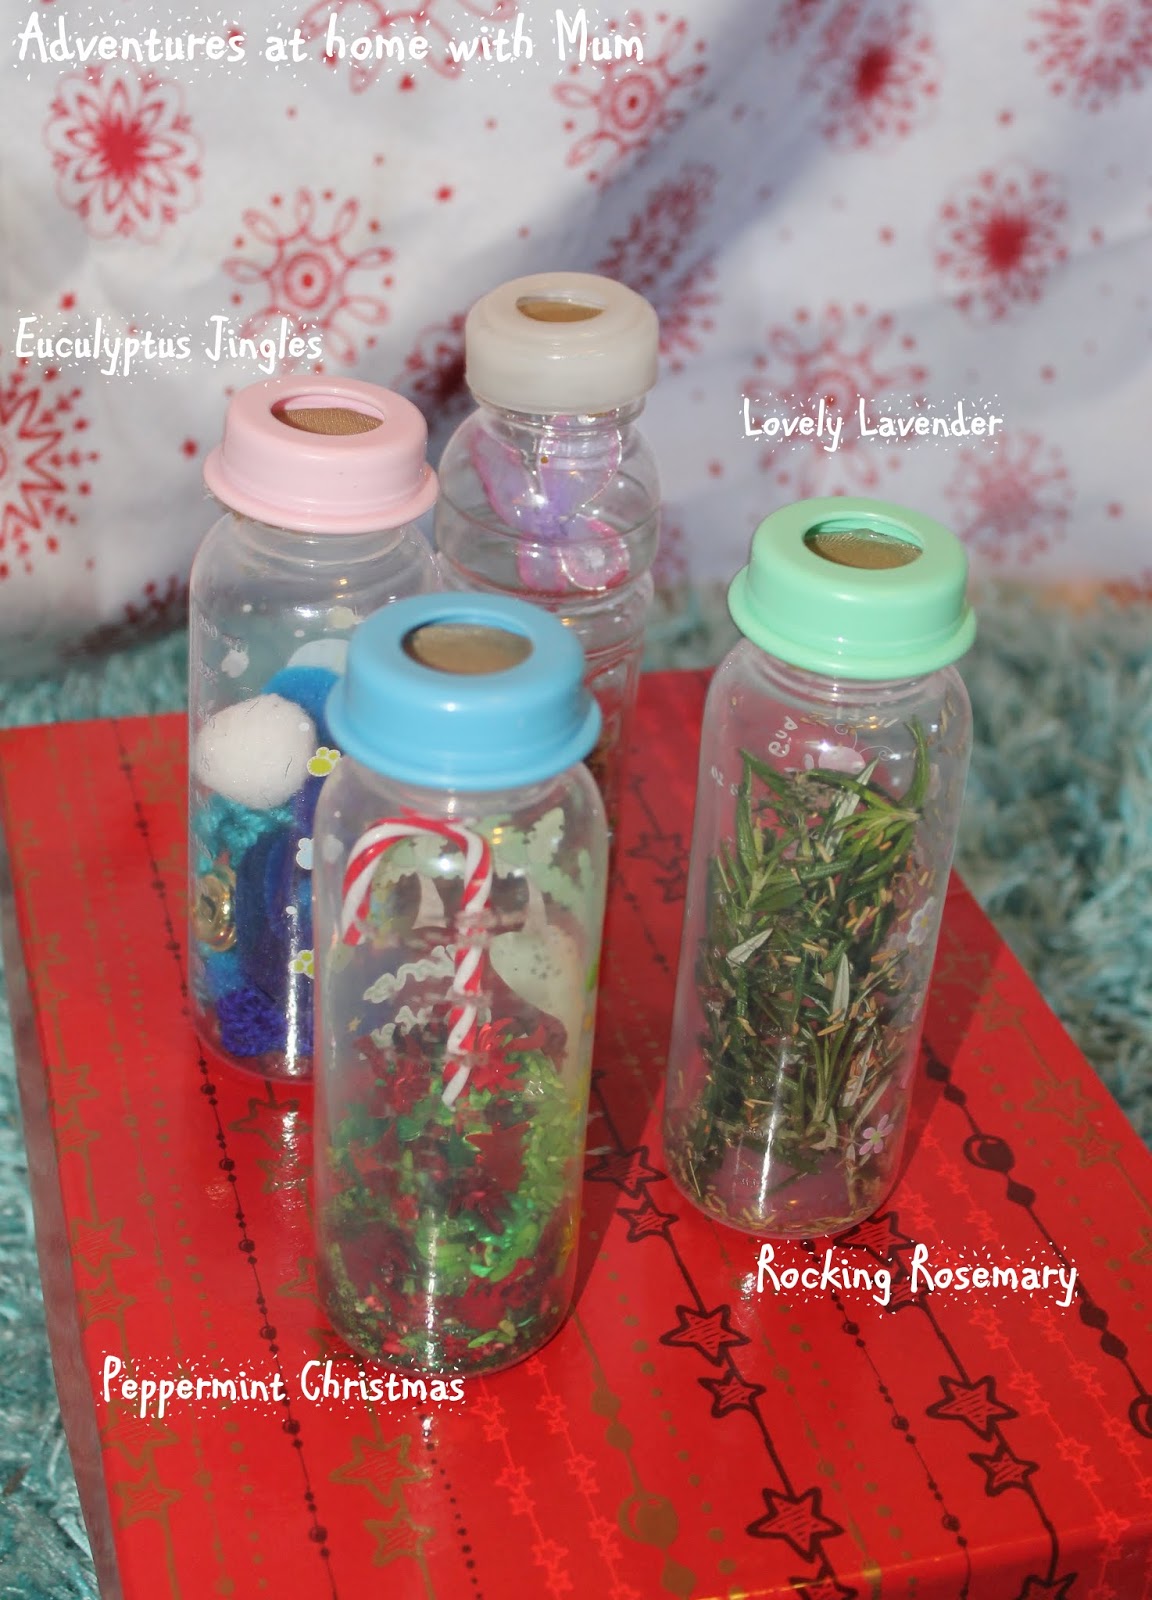
  • Dimples designed a Eucalyptus one using, blue and white pom-poms, some blue knitted wool daisies, some blue pipe cleaners and some metal bells. We added eucalyptus oil in. It smells and sounds great.
  • The Lavender one had some real lavender flowers in it, lavender incense oil dyed rice from our Lavender Zen Rice garden & a little butterfly.
  • The Rocking Rosemary had fresh rosemary from our backyard and some dried herb rosemary from our spice rack. Simple!
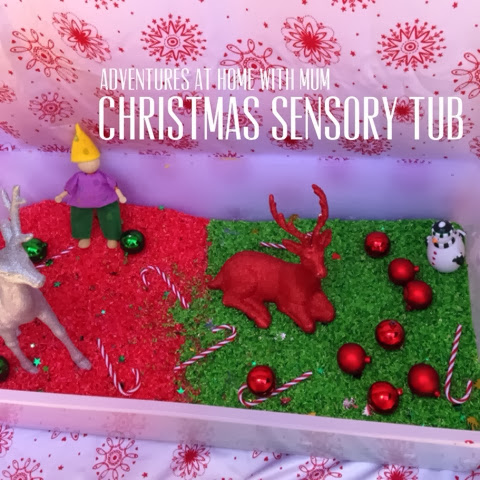
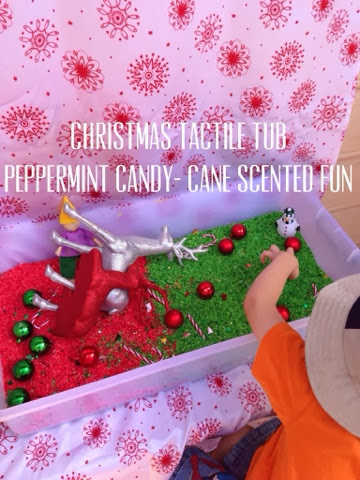
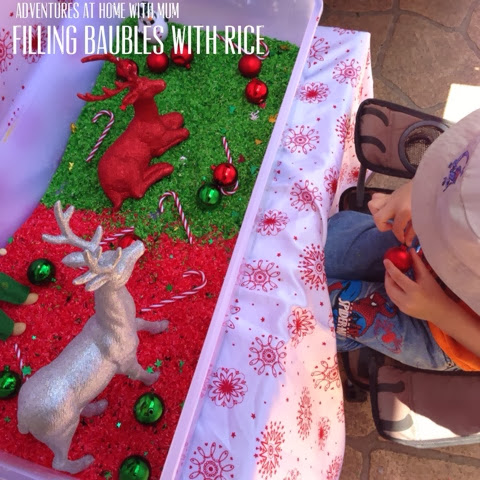
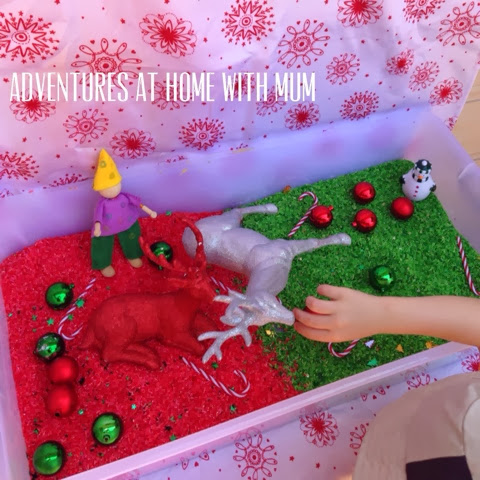
  • The Christmas one had Peppermint scented red & green Rice from our Christmas Rice Sensory Tub, some sequins and a plastic candy cane.
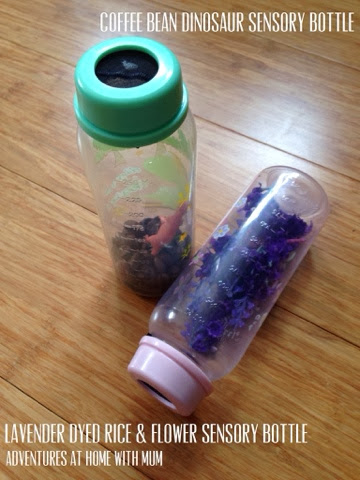
  • We still have the plastic Dinosaur in coffee beans &
  • The old Lavender one that had silk purple flowers and lavender rice.  

All you need to make these are some old baby Bottles, stocking, a hot glue gun and your materials.
Take the teat out of your bottle so your left with a hole, put all your materials in the discovery bottle and the essence or essential oil, and hot glue gun a piece of stocking tight over the lid, then hot glue gun a circle over this and screw your lid on tight. Done!


They smell so sweet.
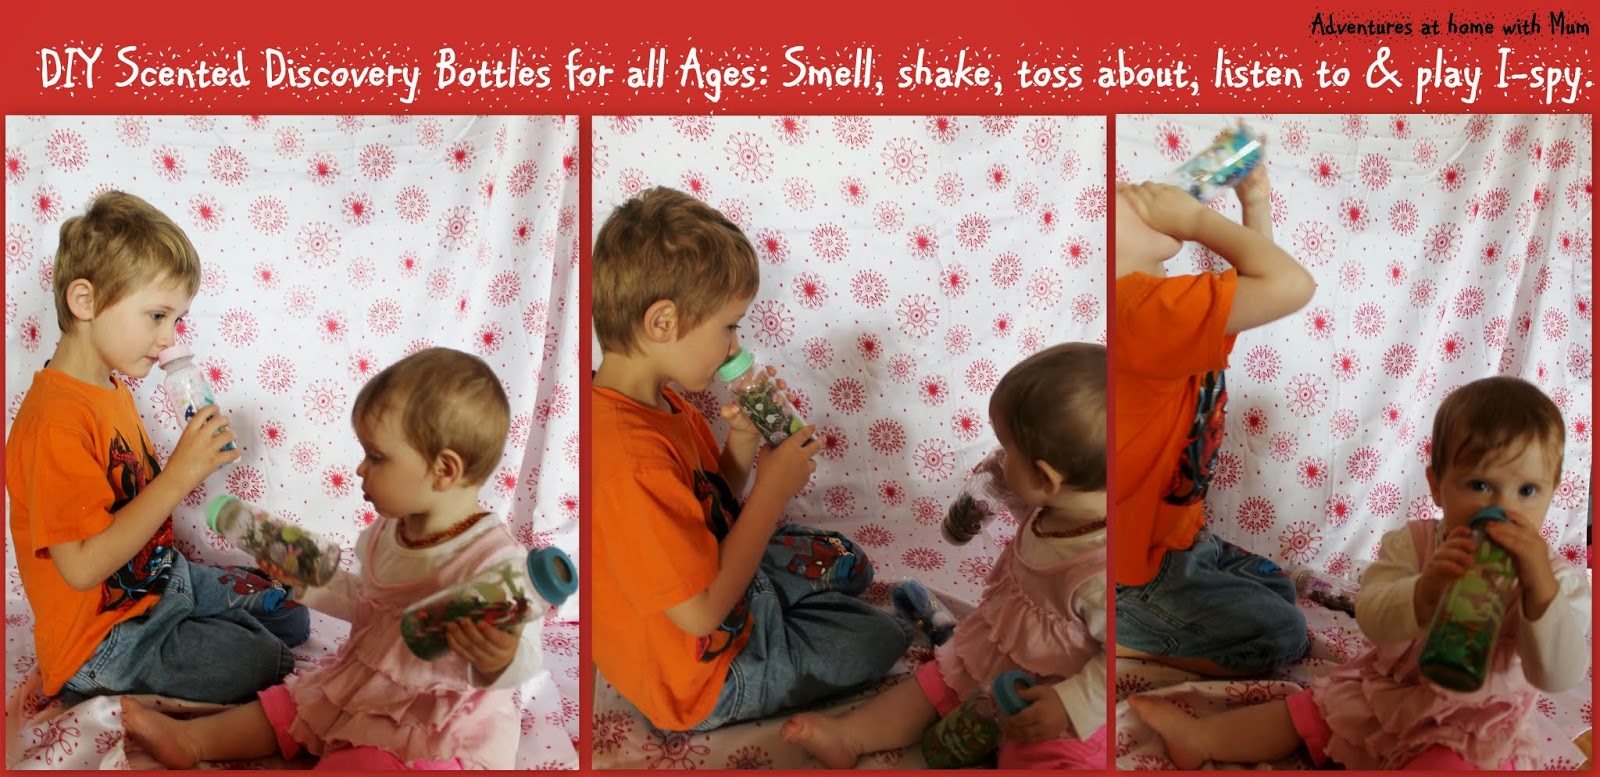
Miss Cherub loves sniffing them, shaking them and transferring them from hand to hand listening to the sounds they make.
Dimples plays I-spy with me and while he had a cold the past week he slept with his eucalyptus one by his pillow.


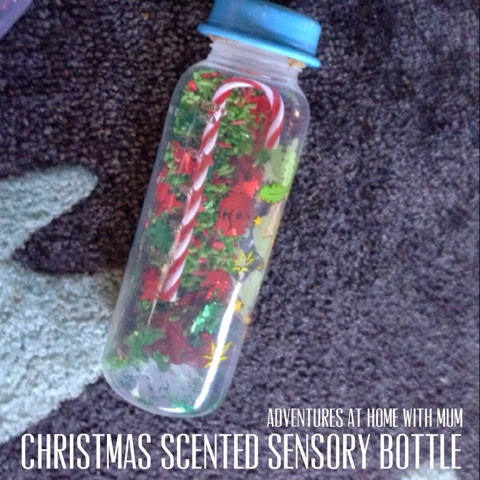
The Christmas themed one looks so festive at this time of year and has been placed up with the Christmas ornaments.

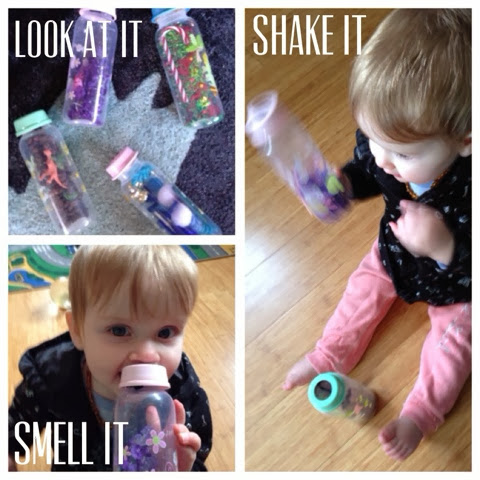
These are a really handy DIY toy that uses all the sense; smell, shake & listen to them, rattle & bang them around, look and see what you can spot. Considering the coffee bean one still smells years later I think this set will be rotated around frequently with the Christmas one getting packed away with our Christmas decorations until next year.


Learning concepts:
Colour coordination
Learning with the senses;
Defining between different scents
Listening to different sounds
Search & find, I-spy games
Baby grasp, transferring between hands.

Happy Adventures :)

You can keep updated with all our Adventures by following Adventures at Home with Mum on Facebook, follow us on Pinterest, or check us out on Instagram.

Christmas Scented Sensory Rice Play


Our first Christmas Spirit Play experience this season is a Peppermint Scented Red & Green Rice Tactile tub.  I dyed a heap of rice with red & green colouring, then as it dried I added Peppermint essence to give it a christmassy smell. It was divine!


Once ready I put in a bag of Christmas themed sequins and glitter, plastic candy canes, some Christmas decorations and Christmas tree baubles. Dimples contrasted the red and the green baubles with the red and green rice. I had taken the ends off the bauble and Dimples started putting grains of rice into them. The hole was tiny so this was a great fine motor task for him & to add to the sensory delight, he found that if he shook them they made a musical ding.


Eventually he mixed the colours around, enjoyed some pretend play with the reindeer & elf figures, they made tracks, the elf rode the reindeer around and then they tripped over the decorations and got buried. Dimples commented on how yummy the rice smelt.


There was a stray bauble that ended up smashed on the ground, they are plastic so I think Dimples had something to do with it 'smashing' he used this cue and filled the open bauble up to plant candy canes in it.


The tactile tub was a great sensory experience with the contrasting colours that were visually appealing, the sound of the rice pouring and flicking around, along with the scent but it also provided a goo imaginary Christmas scene. After a while Dimples decided to fence in the reindeer so they could escape. He very carefully piled up rice and made a rail out of baubles and plastic candy canes.

 
After a while when he started to lack interest I added some more elements. Funnels and large plastic kids tweezers.  He did his usually pouring and experimented with the different funnels then very cleverly used the large tweezers to grab the large Christmas sequins. More fine motor practice and sorting through the rice to find the same sort of sequins. this was time consuming and required lots of focused attention.


Have you played with scented Rice before?
What Scent have you used?

Here are some of our previous posts using rice. They're always a hit! 


Learning Concepts:
Sensory Play
Tactile experiences
Imaginary & pretend play
Exploring Christmas Theme
Fine Motor skills
Sorting

Ideas for Extending:
Make a funnel tree like our split pea funnel tree
Early Measurement principles
Use small figurines to make it a small world
Use sand equipment, like a sand mill to pour rice in

Happy Adventures

Alphabet Chicka Chicka Boom Boom Tree


When it comes to direct learning which isn't hidden in some form of play Dimples finds it quite a bore, looses focus and doesn't want a bar of it. He hasn't really been interested in the alphabet, reading or identifying letters besides his name until recently so to foster this new interest of early literacy in a fun hands on way that isn't plain boring letter recognition we read the funny story Chicka Chicka Boom Boom by Bill Martin Jr. and made a Felt Alphabet tree to go with it.  


We started with two large postal tubes (you know the ones you send posters in), filled one with some sand to weigh it down, duck taped them together and Dimples painted our soon to be tree trunk brown.
Then we did the branches using paper towel rolls painted green, these were cut and shaped to fit into one another at the top of our tree trunk, then they were also taped down firmly.
Next we used some felt cut in the shape of palm leaves big enough to fit over the rolls, these were hot glued down using a hot glue gun. Dimples helped position and press them down.
What is our tree missing? Dimples come up with the idea of using paper bags scrunched into balls to resemble our coconuts. He carefully helped glue them into position and then we were only missing our Alphabet letters.


The Alphabet letters were also glued onto the felt with a hot glue gun. I found some cheap wooden letters off eBay for a few dollars, you could use those plastic magnetic ones or foam letters but these wooden ones did the trick and stuck nicely with hot glue. First we ordered our alphabet along with the story, finding each letter as we read the pages, then once our tree and glue were prepared I called out letters and Dimples went and found them for me, helping to stick them out. This was great for letter recognition and he found fetching them as quickly as possible lots of fun.


The story gives a good opportunity to discuss why we have upper and lower case letters. Why do we have two of each letter? it also goes over the alphabet with visual cues in both the story and the illustration. Its a very upbeat fun story using rhyme and humor.

Once our letters were on we re-read the story and Dimples reenacted it pretending to be certain letters going up the tree and shaking it when they all fell out. Now we use the Chicka Chicka Boom Boom tree in many ways, as a story prop and along with letter identification when we read the story. Dimples points to the letters as I sing the alphabet, we combine it with an Alphabet Abacus and a Alphabet placemat and play letter match, we play I-spy; mixing it up so he can search for individual letters.


Learning Concepts:
Early literacy
Learning the Alphabet
Benefits of craft
Letter recognition
Identifying individual letters
Discussing upper and lower case letters
Connecting literature, hands on craft and fun

Ideas to Extend with:
A DIY Letter Puzzle
Alphabet match using other forms of the Alphabet.
I-Spy Letter search
A name Letter Recognition Sensory Bag
Use magazines and news papers to go on a letter Hunt for a drawn Chicka Chicka Boom Boom tree


You can keep updated with all our Adventures by following Adventures at Home with Mum on Facebook, follow us on Pinterest, or check us out on Instagram.

Mad Scientist Play - Colour Explosions


As a Mummy blogger I am a bits and bobs hoarder; Meaning I keep anything that has prospective crafting or activity purpose. Among my craft cupboards (yes there are many) I had a collection of empty bottles in different shapes and sizes from baby wash, hair conditioner, drink bottles, vases and so forth, plus squirts from hand washes and sprays from bench cleaners that I've rinsed out. I knew I would use them for something cool one day. Here it is!


In Australia its warming up, days are getting lighter and warmer for longer and so along with the Spring air comes lots of outdoors play. The usual bike riding, ball throwing, digging and playing around the yard is all good and fun but this afternoon I set up a mini science lab for Dimples to experiment with.


Dimples had 2 types of experiments to perform as a Mad scientist. I set up a plastic tub station of bottles, three bottles with white vinegar in them and a few drops of food colour, I chose our three prime colours so as they exploded out he would see them mix in the clear tray they sat in. Then in the other two (the vase and the tall bottle) I did a ratio of canola oil and coloured water for some lava lamp eruptions. We have done this before so Dimples knew exactly what to do.


Getting inspired by the set up and the brightly coloured bottles waiting he went and put on his dress up doctor kit, which became his Mad scientist suit, one of my caps that he dubbed a Mad Scientist cap and some clear safety glasses from Adventures Dads tool shed. He was set and ready.

Dimples first broke open some alka-sielter tablets (you know those tablets that are for upset stomachs, you probably have some in the medicine cabinet) and dropped them into the oil filled bottles. See above. The tablet sinks to the water then it fizzes away in the water which makes the coloured water bubble up and erupt into the oil in blobs but as we know it doesn't mix, so it makes it look like a lava eruption. Pretty cool. Dimples had a close up watch until it settled then tried a larger piece to make even bigger coloured eruptions.


The second experiment was vinegar explosions using coloured vinegar in bottles and bicarb soda. The blue worked so well that it did actually splash Dimples in the face. Lucky he had his scientist safety glasses on. The trick to making a good explosion is to be prepared with everything you need on hand, plus extra. Make sure you put enough vinegar in the bottle so that it is about 2/3 full with enough room for it to fizz/build up and spout out the top.  Use a bottle with a small hole, narrow neck and use a wide funnel so that you can get a shot of bicarb soda into the container in one hit.


Dimples had go after go, of course the very first time worked the best with a huge explosion erupting so quickly it exploded out the top of the funnel before he had a chance to move it. Then he tried the blue witha  huge grin and a very loud "Woah" as he shook his vinegar covered hands but each one still continued to fizz over for several tries and the colours that splashed out onto the tray started mixing and looking very cool indeed. Dimples noticed the colours that were mixing and swirled his fingers around in them.


Do you have a Small Scientist waiting to perform some experiments like these?  
I'd love to hear how it goes, leave me a comment below

Learning Concepts:
Science; Oil/Water & Vinegar/Bicarb
Colour recognition
Mixing Prime Colours
Role Playing & Pretend Play
Sensory
Hands on

Ideas to Extend with:
Volcanic Explosions
Colour Mixing on Ice crystals
Do it in the dark; Glowing Vinegar Science
Mixing Prime Colours in bags


You can keep updated with all our Adventures by following Adventures at Home with Mum on Facebook, follow us on Pinterest, or check us out on Instagram.

DIY Dramatic Play Theatre


Dimples loves to dress up, he has an insanely large collection of dress ups for a 4 year old. Over the years I have collected any dress up outfit, pretend play props and funny looking piece of clothing I have come across into a toy box and it got to the point that we were hardly getting them out because there was just too much. So I decided to designate an area for the dress ups and make a play area to encourage Dimples to role play and make use of his collection. Here is the DIY Theatre I made in our lounge room. 


It was so easy, and its the lazy Mums DIY play space. I do have a sewing machine but I had 5 minutes to spare so I grabbed a red sheet, cut it down the middle and laid it across the floor then I put a string across the middle of both 'curtains' and doubled them over so that the string remained in what was now the top. I grabbed a stapler and stapled it about an inch from the edge (making sure the string wasn't in the way and was in the top side. Ok so its not ideal and you may want to sew it but it was easy and any one can do it.
I put a small hook on the wall which is opposite a baluster railing at the top of a stair case, I then tied the strong with the curtains hung from the railing across to the hook, making sure that they open and closed.


You could do it from wall to wall or across a corner of a room I guess, or if you had one of those portable clothing rails that could work. All Dimples dress ups were put in a couple of toy boxes behind the curtains and he started to do performances. Mission Complete.


Its pretty funny!
He is quite the drama King. He starts his performance with the curtain shut and counts down, then he claps three times before he rips the curtains open and springs out into action. He does high energy dances, sings and jumps around the place, he does comedy performances as a clown and falls down over and over and over laughing at him self. He always remembers to do a bow when he is finished.


Dimples tells jokes and because the height of the curtains is head height the DIY theatre also doubles as a Puppet show. He ducks down and uses props to put on a puppet show with his stuffed animals.
Its great for Family Fun. Miss Cherub sits and watches his performances excitedly and on the weekend we had a screen free day where myself, Adventures Dad and Dimples had to take turns doing performances. We spent the afternoon laughing at each other and being silly together.


Dimples has utilized all the dress up gear more in the past two weeks than he has in the past two years.
He has a Monsters Inc suit which is a favourite and a Monsters inc toy that he was talking for as if he was a ventriloquist.  He has developed quite a laugh, he always cracks me up.


Learning Concepts:
Pretend Play
Imagination & Creativity
Role Play
Being Active
Vocabulary
Imitating people, things and animals
Developing a sense of humor
Confidence in self


If you enjoyed this you can Keep updated with all our Adventures by following Adventures at Home with Mum by "liking" us on Facebook or following us on Pinterest 

Happy Adventures :)

Sensory Material Surprise - Baby Play in a Box


Baby Play is so much fun, when baby first starts playing it becomes apparent just how much they're learning through play. My minds going crazy with play ideas.
This little baby activity introduces  sensory learning by providing textures and different feeling materials that are visually appealing, while cognitively developing a babies understanding of objects and object permanence.


Babies learn through their senses so a great way to introduce a baby to play is through different textured materials. First, gather a bunch of material swatches trying to get different feeling materials, look for different materials, different textures, things that you just want to touch that are visually appealing as well. You can then "hide" them folded or rolled up into a box; I have used an ice-cream container with a hole in the lid and a stocking over it so that Miss Cherub can see through into the hole and stretch it to fit her hands in. You could easily use an empty tissue box.


Once all the materials are in the box leave a little corner poking out so they can see there is something to grab out. With no assistance Miss Cherub pulled the materials out one by one, she looked at them, flapped them around felt them and then tried to put them over her head and rub her cheeks on them, then they got thrown to the side as she put her hand in to see if there was more.


As she continued I put the materials in and out of the box so she could see them go in, or see a small end hanging out. This encouraged her to keep seeking out the materials whether she could see them or not.
Between the ages of 4-8 months babies develop what is known as the secondary circular reactions stage of object permanence; this begins by exploring objects, reaching and grasping objects and understanding that it is a real thing that can be handled, they learn distance and that objects right in front of them can in fact be touched, they learn that the object moves and start to reach for objects that were in a position or can partially be seen, then they learn the permanence of an object (that the object exists inside the box, whether they can see or hear it or not).


A great example of this is the game peek-a-boo and a great way to encourage this skill is activities like this.
I had some cool materials; fluffy pieces, leather, pvc, felt, shiny materials, sequined material, bright stripped materials, a New scourer dish cloth, lace, knitted wool daisies, a clean glass cloth, a small piece of outdoor course carpet, a small square of outdoor fake grass and her ribbon tickle toy.  Use your imagination & go on a texture hunt; If you have an older child get them to seek out funky materials & textures to fit in the container. 


Learning Concepts:
Learning by Touch
Exploring textures
Visual discrimination
Object permanence
Pulling, Pushing, Passing materials
Seeking out hiding materials

Ideas to extend:
Make a DIY Ribbon Tickle toy
Use a really large box with scarfs and other large materials
Tie or stitch materials together so they just keep coming out in one trail
Finish by making them into a texture book to keep

If you enjoyed this you can Keep updated with all our Adventures by following Adventures at home with Mum by "liking" us on Facebook or following us on Pinterest 

Happy Adventures 


Mint Choc-chip Ice Cream Play


Does this look real or what?
After seeing some Ice-cream Dough Pinspiration Here I started craving for my favorite flavored ice cream; Mint Choc Chip. 
I thought it would be pretty cool to make this play Ice cream dough, that looks so realistic your kids might try to taste it in a minty green mixtures with choc chips, looking through my play supplies I also found a large tub of ground coffee so I decided to make a coffee scented ice-cream dough as well.


Working with corn flour can be difficult and messy (just a warning) what you need is a bowl with 1 1/2 cup corn flour, then you add 3/4 cup of cheap Hair conditioner your colour and your extract. Here I used a green food dye and a peppermint essence. For the coffee flavour I simply added ground coffee with the conditioner. Depending on the shop your at you may find some suitable conditioner that smells like.... Berries for instance if you were doing a berry ice cream dough. Then Mix; Its a good idea to get some little hands in there mixings it up for a bit of extra sensory experience. It smells so good!


As stated by the creator Play, create, explore, the secret to make it look real is to scoop it roughly and break it off, if you roll it in a ball and use it like a play dough it goes Super smooth and silky. It looks really cool and feels soft but not like real ice cream. See the original ice cream dough post by play -create -explore here: http://www.playcreateexplore.org/2013/01/ice-cream-dough-new-play-recipe.html

For our Choc-Chips in the Mint flavor I added some black and brown beads. 
Then a selection of pom-poms, straws, cardboard cut into triangle wafers for decorating our ice creams.


Using scoops and ice cream bowls Dimples played with the dough and put together some funky looking Ice creams. They look so cool & they smelt really yummy. He put one into the fridge and when Adventures Dad came home from work he looked very puzzled as he opened the fridge and Dimples laughed Hysterically "I tricked you!"

I have tried this several times and failed, but we wont go there! Many bottles of conditioner have been sacrificed. The key to getting the mixture right is don't be like me, don't try and "wing it" you need to go off the recipe and have the cornflour in the bowl first. No water & measure your conditioner, if you have too much liquid it goes more like a goop than a dough. 


So now you have a super yummy scented Ice cream dough that looks very realistic, pop it in the fridge while you set up your pretend ice cream parlour, just long enough to chill it. Once the children are ready to play you will be providing them with an awesome sensory play experience; smells good, visually interesting, feels nice and cold. the only thing they cant do with this stuff is eat it.


Learning Concepts:
Measurement
Mixing
Creativity
Sensory exploration
Imagination
Pretend Play
Imitating Real Life

Ideas for Exploration:
Make your own wafers and ice cream cones from cardboard
Experiment with different flavors; chocolate (cocoa), berry (red color & berry conditioner)
Try our Ice-Cream Sprinkles Dough
You could make real ice cream, search pinterest or google for ice-cream in a bag
and Of course after all that ice cream play you could go ice cream taste testing at a real ice cream parlor.

Happy Adventures


To Keep updated with our Adventures you can follow Adventures at home with Mum on Pinterest or on Facebook  


A Coloured Rice Quarry - Pretend Construction

Last week I colored some rice, adding some Peppermint essence so it smelt super Yummy. 
I had no idea what I was going to do with the rice but Dimples hasn't had a Tactile Play tub in a while so I dyed some red, yellow and green. I dyed the rice by getting 3 separate bowls of dry rice, adding a smidgen of water and some color, mix it all around and let it sit for at least half an hour, then spread it evenly out on paper toweling and let it dry for a day. 
Dimples had seen it and asked to use his cars in it, so I set up a mini Construction Quarry. I kept the rice in a tray on top of a spill mat and laid it out separately (knowing that it would get mixed up- but that's part of the fun), collected some dump trucks and construction vehicles, trailors, some plastic trees, traffic cones and traffic lights. It looked very bright and visually appealing but it smelt minty and fresh also.
Dimples transferred colors dumping one lot on top of another color then he used the roller to flatten piles, and the snow scraper to clear a path. He went through and worked out which vehicles made the best tracks and which ones carried a trailer full of rice. It was a pretend quarry and there was lots of clever narration from Dimples being heard as I let him play freely.
He had his go at mowing the green rice and eventually all the colours got mixed together, he made a huge pile that was a hill then rolled it flat. He did try to separate and sort some colours out into dump trucks once they were all mixed up but it proved to be too time consuming.
Dimples did a great job at containing the rice in the tray, even after lots of trucks had to have a go at making burn out tracks and " skids" through the rice, then he parted the rice down the center. All the tipper trucks got loaded up and made a big pile, they were dumping and hauling rice from one end of the tray to the other, Dimples was pretending it was a Dangerous Construction site and had his sign at the site of danger.
Dimples keep mentioning how yummy it smelt, at one stage the little plastic trees were pine trees because it smelt so nice. The pretend construction quarry, clever and cute narration and imaginary play went on for a hour or so. He thoroughly enjoyed it and when I left him to have free play it was nice to listen to his little imaginary world come to life.

Learning Concepts:
Colour identification
Tactile/Sensory Play
Developing imagination
Imitating real life through play
Fine Motor
Colour sorting

Ideas for Extension:
Car & Construction Ideas:  Playdough tracks, Tire Paint Printing, Dirt digging & more
A pretend play car wash

LinkWithin

Related Posts Plugin for WordPress, Blogger...